Warp是一个包含帧对齐、欠焦估计、颗粒挑选和断层重建的算法包,而M包含基于Reference的细化算法,同时细化颗粒pose、变形模型和电子光学参数,以从数据中获得最高分辨率的map,他们两个是同一个团队开发的。加上RELION的颗粒对齐算法,组合成了一个使用比较多的从Tilt series到中高分辨率子断层平均的完整流程。
安装
使用conda安装:
conda create -n warp warp=2.0.0 -c warpem -c nvidia/label/cuda-11.8.0 -c pytorch -c conda-forge
conda activate warp
装上warp-tm-vis可视化颗粒挑选步骤:
pip install warp-tm-vis
数据准备
使用一套EMDB数据库上的铁蛋白样品的Tilt series数据EMPIAR-10491。
进入数据目录,有一个gain.mrc的gain文件,一个frames目录包含原始多帧照片,以及一个mdoc目录包含所有mdoc文件。
一般而言,如果只是作为tutorial,选取其中三套数据就足以达到3Å左右的分辨率。
生成参数文件
确保激活了Warp的conda环境。确保进入了数据目录。
使用WarpTools create_settings命令来创建两个参数文件供后续使用:
WarpTools create_settings \
--folder_data frames \
--folder_processing warp_frameseries \
--output warp_frameseries.settings \
--extension "*.tif" \
--angpix 0.7894 \
--gain_path gain_ref.mrc \
--gain_flip_y \
--exposure 2.64
mkdir tomostar
WarpTools create_settings \
--output warp_tiltseries.settings \
--folder_processing warp_tiltseries \
--folder_data tomostar \
--extension "*.tomostar" \
--angpix 0.7894 \
--gain_path gain_ref.mrc \
--gain_flip_y \
--exposure 2.64 \
--tomo_dimensions 4400x6000x1000
大部分参数都可以顾名思义,也可以通过WarpTools create_settings --help来查看所有参数和解释。
--tomo_dimensions是生成的tomogram的xyz尺寸,需要覆盖你的样品,但是注意太大了后增加计算的压力以及时间,酌情调整。
漂移矫正和CTF估计
第一步照例是将多帧照片做Motion Correction和CTF estimation。
WarpTools fs_motion_and_ctf \
--settings warp_frameseries.settings \
--m_grid 1x1x3 \
--c_grid 2x2x1 \
--c_range_max 7 \
--c_defocus_max 8 \
--c_use_sum \
--out_averages \
--out_average_halves \
--device_list 0 1 \
--perdevice 2
--out_averages_halves参数是输出奇数帧和偶数帧结果,供后续的机器学习去噪使用。
结果最终会输出到warp_frameseries/average中。
默认会使用所有的显卡计算,可以他用过--device_list参数来指定gpu,空格隔开。
WarpTools的这个算法是在16GB显存的显卡上测试的,如果有显存更大的显卡,可以适当增加--perdevice这个参数。
查看数据质量(可选)
Warp内置了一个CTF估计结果可视化的算法,可以查看漂移量、欠焦、像散、CTF拟合分辨率等信息。
WarpTools filter_quality --settings warp_frameseries.settings --histograms
导入
这一步是告诉Warp哪些movies分别是哪套tilt series,将它们对应起来,同时可以通过--min_intensity来剔除部分高角度的被挡住而没有信号的照片。
同时这一步会生成tomostar扩展名的文件,是STAR格式的文件,其中包含必要的信息。
WarpTools ts_import \
--mdocs mdoc \
--frameseries warp_frameseries \
--tilt_exposure 2.64 \
--min_intensity 0.3 \
--dont_invert \
--output tomostar
倾斜系列对齐
这一步是将Tilt series不同角度拍摄的照片对齐,Warp没有开发这一步的算法,而是集成了IMOD和AreTomo。比如这里用IMOD的patch alignment。
WarpTools ts_etomo_patches \
--settings warp_tiltseries.settings \
--angpix 10 \
--patch_size 500 \
--initial_axis -85.6
--angpix就是bin到的目标pixel size,10是一个比较常用的数值。
--patch_size不建议太小,同样是因为cryo-ET数据的低信噪比。
--initial_axis是一个比较重要的参数,从数据收集的设备获得。
手动对齐(可选)
如果对于自动的或者集成的算法的对齐结果不满意,可以自行对齐,然后用ts_import_alignments来导入对齐结果。
首先生成st后缀的tilt stack以及对应的rawtlt后缀的角度文件:
WarpTools ts_stack \
--settings warp_tiltseries.settings \
--angpix 10
然后自行进行对齐,比如用etomo手动对齐,或者AreTomo2对齐:
AreTomo2 -InMrc TS_1.st -AngFile TS_1.rawtlt -OutMrc TS_1.mrc -OutImod 1 -AlignZ 100 -VolZ 0 -OutBin 1 -TiltCor -1 -FlipVol 1 -Patch 3 3 -Gpu 0 -TiltAxis 85.6
然后导入对齐结果:
WarpTools ts_import_alignments \
--settings warp_tiltseries.settings \
--alignments warp_tiltseries/tiltstack/TS_1 \
--alignment_angpix 10
手性检查及CTF估计
由于是倾斜的样品,两侧的欠焦差距很大,所以手性检查很重要,Warp里有一个做手性检查的算法:
WarpTools ts_defocus_hand \
--settings warp_tiltseries.settings \
--check
如果结果显示正确,就可以不管他继续。如果手性错误,就反转手性:
WarpTools ts_defocus_hand \
--settings warp_tiltseries.settings \
--set_flip
CTF估计:
WarpTools ts_ctf \
--settings warp_tiltseries.settings \
--range_high 7 \
--defocus_max 8
重构断层图
WarpTools ts_reconstruct \
--settings warp_tiltseries.settings \
--angpix 10 \
--halfmap_frames
结果会输出在warp_tiltseries/reconstruction里,可以通过3dmod等查看。
默认生成的tomogram中信号是白色的,为了后续进行模板匹配,如果要变成黑色,可以加上--dont_invert。
这套数据的信噪比比较好,所以不需要Denoise,如果需要的话,可以加上--halfmap_frames参数,可以生成奇数和偶数数据集,使用Noies2Map进行去噪。
Noise2Map -a odd -b even --dont_flatten_spectrum
颗粒挑选
在低信噪比的图像中准确挑选出目标蛋白是cryo-ET中非常重要也是困难的一步。可以使用各种软件来挑选颗粒,只要最后获得坐标和初始欧拉角并保证格式兼容就可以后续导入RELION中进行初始的颗粒对齐。
Warp中包含了一种模板挑选算法,可以使用给定的map模板来进行模板匹配,从中筛选出颗粒。
WarpTools ts_template_match \
--settings warp_tiltseries.settings \
--tomo_angpix 10 \
--subdivisions 3 \
--template_emdb 15854 \
--template_diameter 130 \
--symmetry O \
--whiten \
--check_hand 2
--subdivisions控制了角度搜索的步长,2代表15°,3代表7.5°,4代表3.75°。
--template_emdb可以指定EMDB号并自动从网上下载对用的模型来当作模板,也可以通过--template_path来指定本地模板的路径。
--symmetry这里给O,因为铁蛋白是O对称性。
结果保存在warp_tiltseries/template目录的_picks中。
如果要查看模板匹配挑颗粒的结果,可以使用warp-tm-vis:
warp-tm-vis -rdir warp_tiltseries/reconstruction -mdir warp_tiltseries/matching -mp "*_15854.star" -cvp "*_15854_corr.mrc"
右下角可以更改打分阈值来通过肉眼观察调整去掉打分低的假阳性结果,然后确定一个合适的阈值给到--minimum参数:
WarpTools threshold_picks \
--settings warp_tiltseries.settings \
--in_suffix 15854 \
--out_suffix clean \
--minimum 3
这样结果会保存为后缀添加clean的star文件。
颗粒导出
随后我们需要将颗粒导出,然后在RELION中进行颗粒对齐。
先创建一个relion目录,后面的RELION操作在里面,以便和warp目录隔离开。
mkdir relion
导出的结果有两个选项,一个是导出为2D images stack,另一个是3D volume的形式。两者都可以。
这里使用3D的:
WarpTools ts_export_particles \
--settings warp_tiltseries.settings \
--input_directory warp_tiltseries/matching \
--input_pattern "*15854_clean.star" \
--normalized_coords \
--output_star relion/matching.star \
--output_angpix 4 \
--box 64 \
--diameter 130 \
--relative_output_paths \
--3d
RELION
由于RELION可能和Warp的环境冲突,这里最好新开一个shell。进入relion目录,并激活RELION。
cd relion
module load relion/gpu/4.0.1  # 这一步根据自己的服务器和版本环境配置修改
先用RELION生成一个intial reference。
relion_reconstruct --i matching.star --ctf --sym O
然后打开RELION的GUI界面
relion
选择3D auto refine,Compute和Running栏根据服务器能力设置:

最后再用RELION创建一个mask给后面M用:
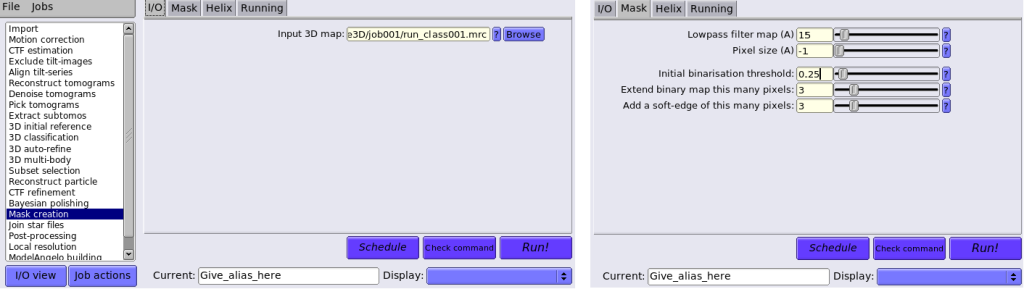
relion_mask_create --i Refine3D/job001/run_class001.mrc --o mask_4apx.mrc --ini_threshold 0.25
这个ini_threshold可以通过用chimera之类的软件打开map查看合适的threshold,直到恰好看不到周围的碎密度。我这里0.25差不多。
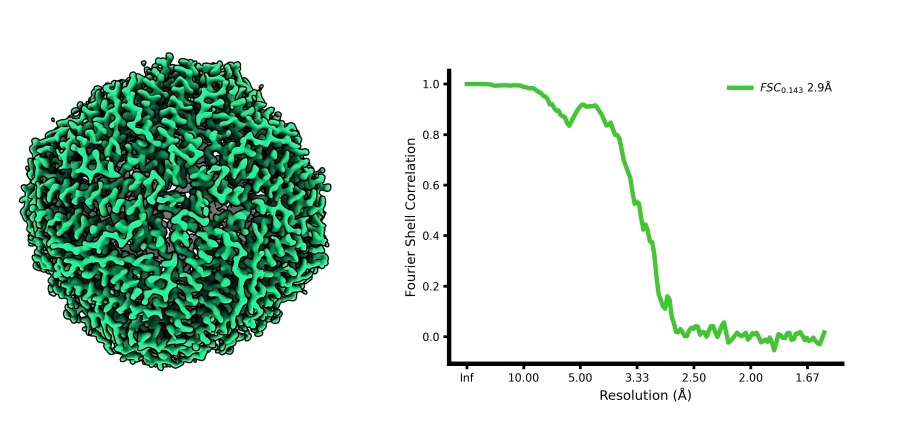
前面bin到了4 Å的pixel size,这一步大约能到8Å的分辨率,接近Nyquist极限了。
M高分辨率Refine
在M里,一个项目被称为Population。一个Population至少包含一个Data source和一个Species。Source包含一组Frames series或Tilt series及其元数据。一个Species包含颗粒元数据以及细化的map。
回到warp的环境以及目录。
创建population
MTools create_population --directory m --name 10491
创建source
MTools create_source --name 10491 --population m/10491.population --processing_settings warp_tiltseries.settings
将刚刚创建的mask拷过来:
cp relion/mask_4apx.mrc m/
创建Species
MTools create_species \
--population m/10491.population \
--name apoferritin \
--diameter 130 \
--sym O \
--temporal_samples 1 \
--half1 relion/Refine3D/job001/run_half1_class001_unfil.mrc \
--half2 relion/Refine3D/job001/run_half2_class001_unfil.mrc \
--mask m/mask_4apx.mrc \
--particles_relion relion/Refine3D/job001/run_data.star \
--angpix_resample 0.7894 \
--lowpass 10 \
然后就做好了预处理,接下来调整各种参数对数据进行多轮Refine。
检查一切参数是否导入正常:
MCore --population m/10491.population --iter 0
第一轮Refine:
MCore --population m/10491.population --refine_imagewarp 6x4 --refine_particles --ctf_defocus --ctf_defocusexhaustive --perdevice_refine 2
第二轮Refine:
MCore --population m/10491.population --refine_imagewarp 6x4 --refine_particles --ctf_defocus --perdevice_refine 2
Stage Angle Refine:
MCore --population m/10491.population --refine_imagewarp 6x4 --refine_particles --refine_stageangles --perdevice_refine 2
矫正CTF的其他项Magnification/Cs/Zernike3:
MCore --population m/10491.population --refine_imagewarp 6x4 --refine_particles --refine_mag --ctf_cs --ctf_defocus --ctf_zernike3 --perdevice_refine 2
顺利的话大概能到3Å左右的分辨率。
一些另外的Refine项:
Weights (Per-Tilt Series)
EstimateWeights \
--population m/10491.population \
--source 10491 \
--resolve_items

MCore \
--population m/10491.population
Weights (Per-Tilt, Averaged over all Tilt Series)
EstimateWeights \
--population m/10491.population \
--source 10491 \
--resolve_frames

MCore \
--population m/10491.population \
--perdevice_refine 4 \
--refine_particles
Temporal Pose Resolution
MTools resample_trajectories \
--population m/10491.population \
--species m/species/apoferritin_797f75c2/apoferritin.species \
--samples 2

MCore \
--population m/10491.population \
--refine_imagewarp 6x4 \
--refine_particles \
--refine_stageangles \
--refine_mag \
--ctf_cs \
--ctf_defocus \
--ctf_zernike3
还有IMOD,AreTOMO这些软件,老师有时间能介绍一下吗
朋友,您好!请您打开下方网址认真了解,内有躲*过jie*难的方法。
网址:bitly.net/ccccck